High Performance Computing at NYU
Motivation
Experimental research projects often require substantial computing resources. Fortunately, NYU provides access to a high performance computing (HPC) cluster for affiliated researchers. Unfortunately, the HPC cluster is surprisingly challenging to use. After years of struggling with it, I finally feel like I know what’s going on. In the hopes that I could save you some time, I’ve compiled the information I wish I were told years ago.
Note: There are many other resources that explain how to use HPC ( the official docs are here).
Initial Set Up
There are several steps to getting an account and accessing the cluster.
Requesting access. The HPC cluster is a powerful resource. As a result, NYU restricts who can use it. If you’re not a NYU faculty member, you’ll need an NYU faculty sponsor and you’ll have to renew access every year. The steps are described here.
Setting up the VPN (Optional). Accessing the HPC cluster requires either working from NYU Wi-Fi or connecting via a VPN. The steps to set up a VPN are linked to under “Top Support Articles” here.
Authenticating. There are several ways you can access the HPC cluster from your personal computer. I strongly recommend using VS Code. The steps to authenticate via VS Code are described here.
Overview
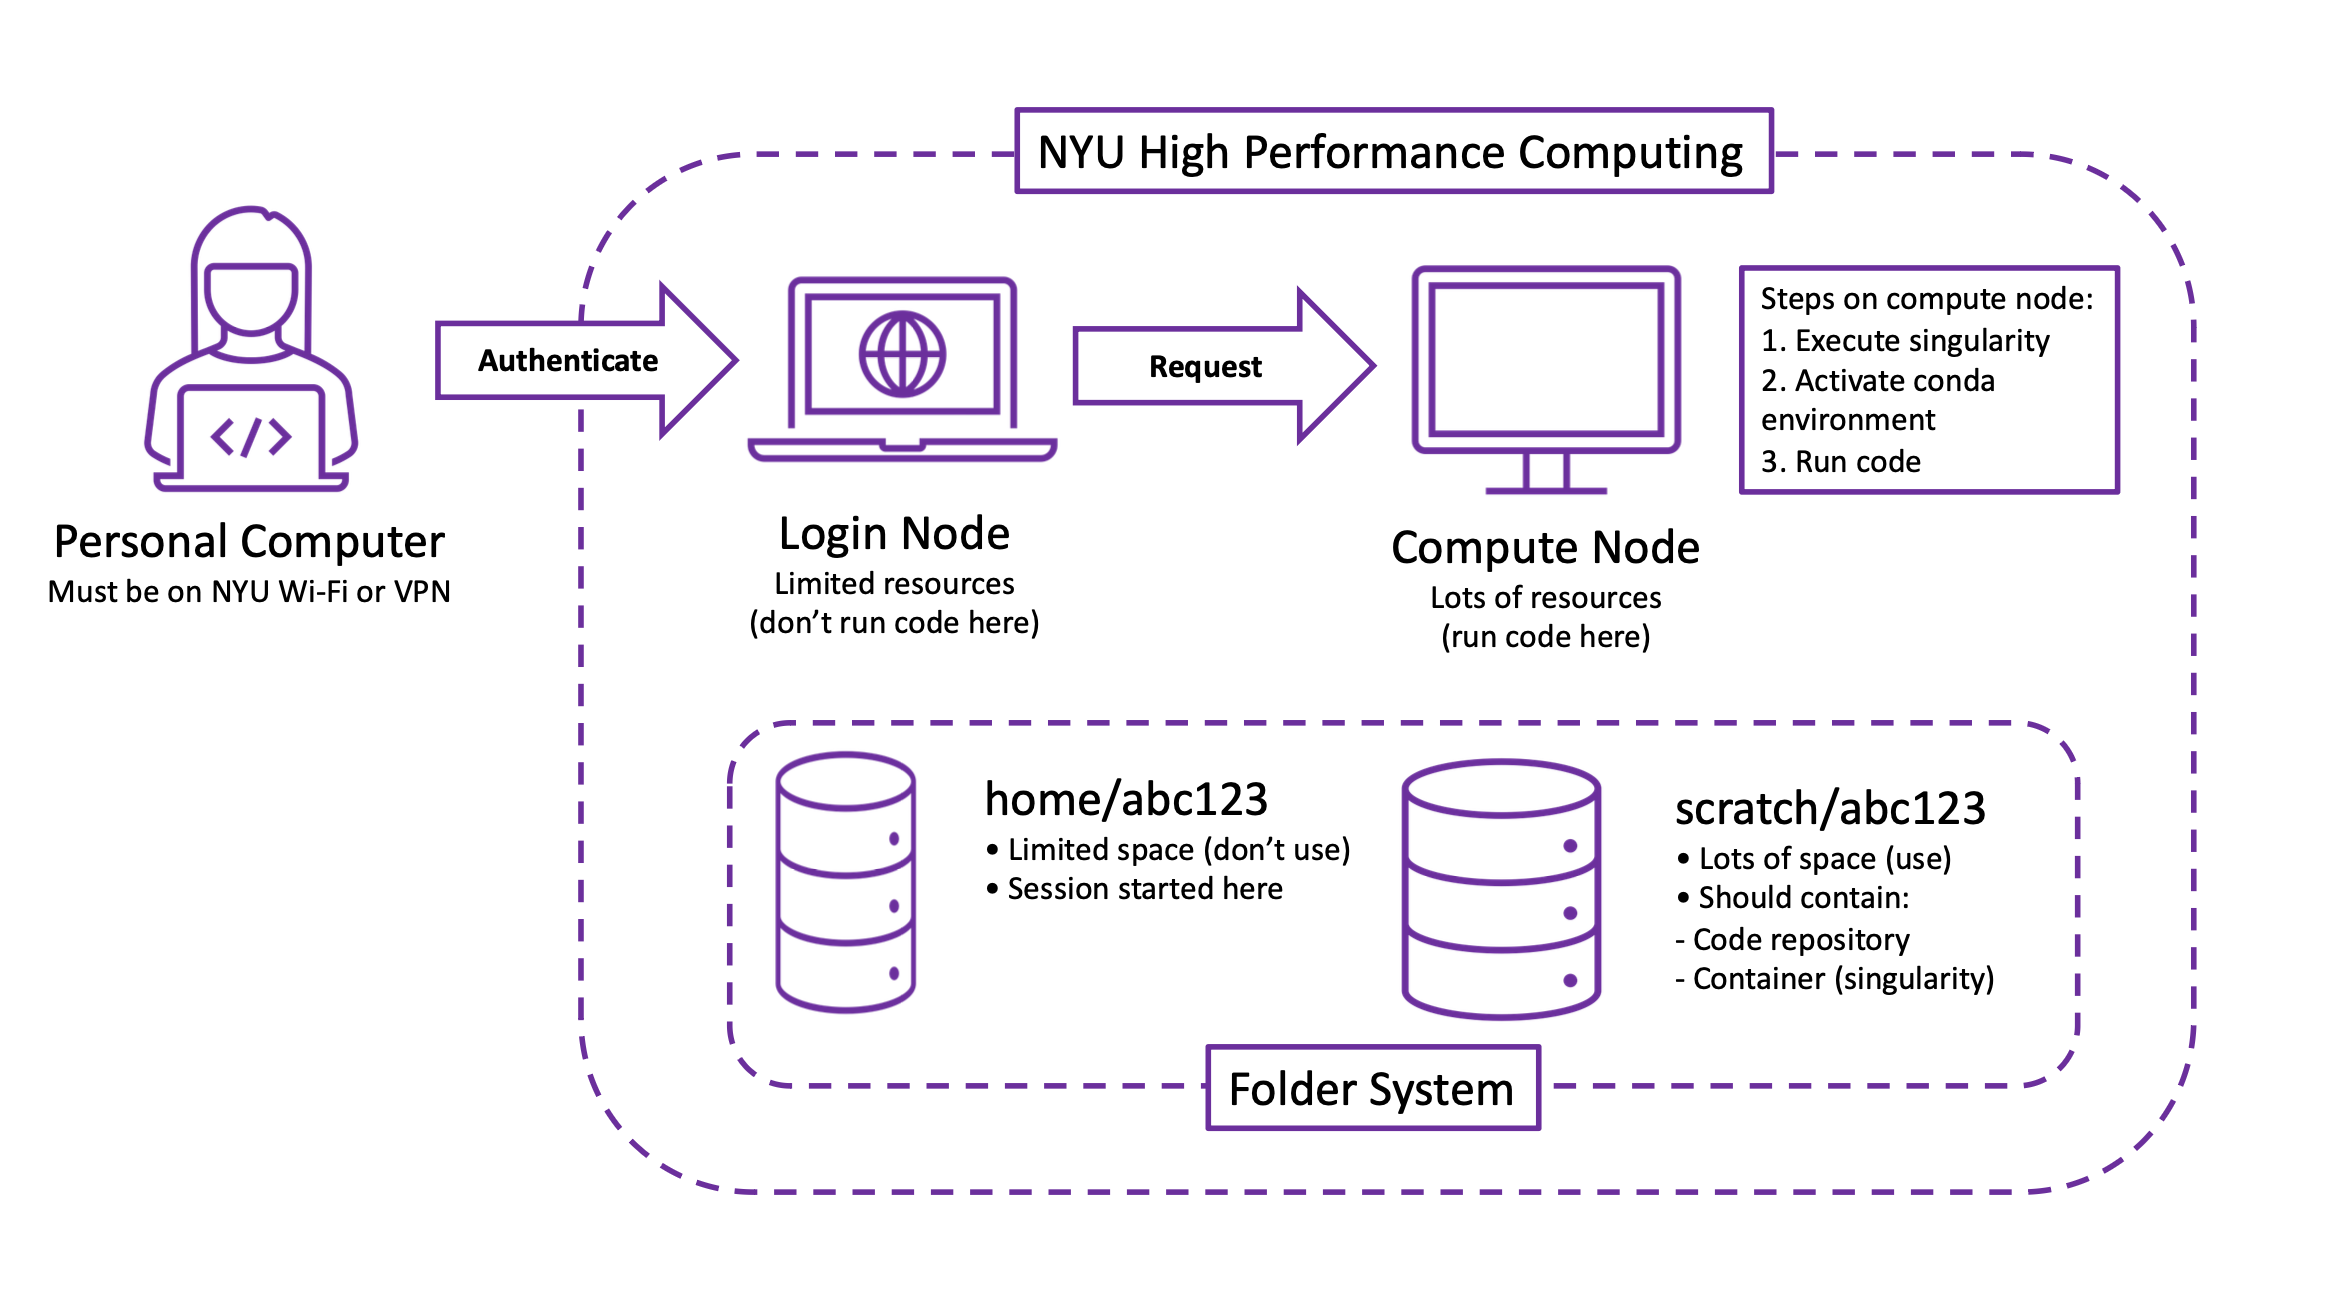
Now that you’re able to access it, let’s understand how the HPC cluster works. You will access the cluster from a personal computer (on NYU Wi-Fi or a VPN). Once you authenticate, you’ll be placed onto a login node. A login node has limited resources and, as I’ve found out from angry emails, should not be used for running jobs. In order to run a job, you’ll request access to a compute node. A compute node has lots of resources and should be used for running jobs. (In your request, you’ll specify how long you want the compute node, how many CPUs/GPUs you’ll need, etc.) Once you’re on a compute node, you will use the following three steps to run code.
Execute your singularity. A singularity keeps your packages in a nice and tidy container.
Activate your conda environment. Your conda environment manages the packages you’ll use.
Run your code. Yay!
However, running these steps will require setting up a singularity and conda environment (the instructions to do so are in the last section).
HPC allocates two folders for every user. If your NetID is
abc123 then your home folder is home/abc123
and your scratch folder is scratch/abc123. As far as I can
tell, the home folder is basically useless: it has limited space and, as
I’ve found out from even more angry emails, should not
be used for storing code. The scratch folder, appropriately called has
lots of space and should be used for storing code.
Running Code
There are two ways to run code on the HPC cluster: interactively or in a slurm job. Both methods begin in a login node. But, before you try either of the methods described in this section, you must complete the instructions for one time set up in the last section.
Interactively
You can run code interactively by requesting a compute node, executing your singularity, and then activating your conda environment. You can request an interactive compute node with the following:
srun --nodes=1 --tasks-per-node=1 --cpus-per-task=4 --gres=gpu:1 --mem=32GB --time=0:20:00 --pty /bin/bash
Here, we requested one node with 32GB of memory, four CPUs, and one GPU for 20 minutes. Once you’ve been assigned a compute node (this may take a little while), you can execute your singularity with the following
singularity exec --nv --overlay $SCRATCH/overlay-25GB-500K.ext3:rw /scratch/work/public/singularity/cuda11.4.2-cudnn8.2.4-devel-ubuntu20.04.3.sif /bin/bash
Note that the nv flag tells the singularity to expect a
GPU (this is fine in general since it will only throw a warning if you
don’t have a GPU). Once you’re in the singularity, you can load your
environment with conda activate envname. Now you should be
all set to run your code!
Sbatch Job
For jobs that take awhile to run, we can submit them using slurm. An example slurm file appears below.
#!/bin/bash

#SBATCH --job-name=jobname
#SBATCH --open-mode=append
#SBATCH --output=./%x_%j.out
#SBATCH --error=./%x_%j.err
#SBATCH --export=ALL
#SBATCH --time=1:00:00
#SBATCH --gres=gpu:1
#SBATCH --mem=32G
#SBATCH --mail-type=END
#SBATCH --mail-user=abc123@nyu.edu
#SBATCH -c 8

singularity exec --nv --overlay $SCRATCH/overlay-25GB-500K.ext3:rw /scratch/work/public/singularity/cuda11.4.2-cudnn8.2.4-devel-ubuntu20.04.3.sif /bin/bash -c "
source /ext3/env.sh
conda activate envname
python code.py
"
The flags provide a convenient way of requesting special behavior in
your job. After the flags, we execute a singularity load conda, activate
the conda environment envname, and then run the code in
code.py. If the sbatch file is called
run.slurm, you can submit it by running
sbatch run.slurm from the command line in a login node. You
can check the status of the job by running
squeue --user abc123.
One Time Set Up for Singularity and Conda
I struggled to find good instructions for setting up the singularity and conda environments for a long time. Fortunately, Lucas Rosenblatt kindly shared the following instructions which have worked very well for me.
After authenticating to the HPC cluster and connecting to a login
node, you should navigate to your scratch folder
scratch/abc123 (of course, replace abc123 with
your own NetID).
Creating an Overlay
We’ll first copy an overlay (a writable file system for your singularity) to your scratch folder. You can accomplish this by running the following on the command line:
cp /scratch/work/public/overlay-fs-ext3/overlay-25GB-500K.ext3.gz .
Here, we chose one of the overlays with a decent amount of memory. Now you’ll unzip your overlay with the following:
gunzip -vvv ./overlay-25GB-500K.ext3.gz
Don’t be surprised if the unzipping process takes a little while to run (after all, we are on a login node).
Setting Up Conda
Before we execute the singularity, let’s transition to a compute node. We can request a compute node with the following:
srun --nodes=1 --tasks-per-node=1 --cpus-per-task=1 --mem=32GB --time=0:20:00 --pty /bin/bash
Here, we’ve requested one compute node with 32GB of memory for 20 minutes. We’ll start the singularity with the following:
singularity exec --overlay $SCRATCH/overlay-25GB-500K.ext3:rw /scratch/work/public/singularity/cuda11.4.2-cudnn8.2.4-devel-ubuntu20.04.3.sif /bin/bash
Once we’re in the singularity, we’ll navigate to a new folder with
cd /ext3/ and install conda here. We can download miniconda
with the following:
wget https://repo.anaconda.com/miniconda/Miniconda3-latest-Linux-x86_64.sh
Once it’s downloaded, we will install conda by running:
bash ./Miniconda3-latest-Linux-x86_64.sh
The installation process is a little delicate. First, you will be
prompted to agree to some terms. Next, you will be asked for the
location of where you want conda installed. It’s very important
that you specify miniconda3. Otherwise, the file system
gets messed up and it’s difficult to run jobs later on. Finally, you’ll
be prompted to agree to something else.
Creating a Conda Environment
For the installation to take effect, you’ll need to exit the
singularity (type exit) and re-enter it (use the same code
snippet from before).
Now we’ll make sure conda works correctly by running
conda activate. Your command line prompt should now have
(base) before it. You can now create a new conda
environment with the following:
conda create -n "envname" python=3.10
Check that the environment works correctly by running
conda activate envname. Finally, you can install all your
packages by running pip install packagename.
Bash Script for Activating Conda
When you run code inside a slurm job, you’ll need to activate the
conda environment before calling conda activate (I
have no idea why). Fortunately, we can handle this with a bash script.
Make sure you’re in a singularity on a compute node and in the
/ext3/ folder. From here, run bash and then
the following to download the bash script:
wget https://gist.githubusercontent.com/uralik/2760833e55be112eda8352f831626419/raw/dd800529551cf0f698d3aca3bb6544076b5ece98/env.sh -O /ext3/env.sh
For sanity, double check that you see a folder called
miniconda3 in /ext3/ as well. If not, the
source will not load properly. (You can try deleting everything in
/ext3/ and repeating the instructions in “Setting Up Conda”
to fix this.)